Meet Pat

Video (Meet Pat) -

Monday, July 30, 2007

Framing Your Quilling

Framing Your Work

We get lots of questions about matting and framing here at Whimsiquills. When I first started selling my work, (lol), those many years ago, I would put my quilling on wooden plaques. But my customers wanted the quilling under glass. Those of you who have been quilling for a long time may remember the metal frames put out by Intercraft. They had a plastic insert that kept the mat away from the glass, they were inexpensive and gave just the right amount of room, but they didn’t hold up very well and over the years the quality became poorer and poorer. . . and finally they became harder and harder to find. I became frustrated, just like every other quiller, trying to find a nice frame that wouldn’t look “cheap”, but that I could afford. That’s when my husband, who was in the process of changing jobs, went to framing school. Boy did he (WE) learn a lot! It took us a couple of years, but we finally found a company which mad a special double rabbet frame for us, which was really perfect for quilling! Unfortunately, we have since lost that supplier because we were only purchasing five to six hundred frames a year, Whimsiquills is just too small. (I guess everything in this country has to be supersized to make it).

When I look at a frame, the first thing I check for is the depth of the frame. The space between the lip where the glass sits and the back of the frame is called the rabbet. (We will put up pictures of everything on a sheet called Framing in the reference folder of the pics file; you might want to print out the framing sheet to refer to while reading this so it makes more sense.) The rabbit needs to be at least ½” deep, in order to accommodate fringe flowers and/or roses.


The ideal frame would have a double rabbet, (see Figure 1 on framing) one to put the glass on, and a second (lip/rabbet) a minimum of ½”back. This is where the quilled mat and whatever backing you use would rest. (The majority of framed pieces I sold and still sell are wedding invitations or baby frames. I like to have a frame where the invitation could be taken out and replaced with a wedding photo, or the baby photo could be updated. This was particularly important when my work was purchased in a store. The customer had to be able to do this for himself). The mats and backing would be held in by metal flex tabs that would lift up so it would be easy to remove the mat and change things like photographs in the quilled mat. The mat size in a double rabbet frame will be slightly larger than the glass size, so the mat sits on the second rabbet and doesn’t “fall” against the glass. You may be able to find double rabbet mouldings in some frame shops, where they can make up a frame for you in any size; they are however, very expensive. Oh well, let me tell you what I am doing for frames now.

Once again, I try to find a moulding that I like, (I prefer something that looks like a conventional frame rather than a straight sided shadowbox.) and check for the depth of the rabbet. If I have only a half inch to work with, I will try to work out of the back of the frame. (See Figure 2 on framing) This means I cut my mat to lay on the back of the frame, once again, this means cutting the mat slightly larger than the glass size so it doesn’t fall into the frame and against the glass. I usually leave about ¼” of the back of the frame showing all around the mat. After I have completed my quilling, I put a strip of double sided tape (framers call this ATG tape, it is made by Scotch and will say Adhesive Transfer Tape) on the back of the frame. This tape is paper backed so it is pretty easy to work with; don’t take the paper backing off until you are ready to put your mat on, cause it is really sticky. You might want to mark on the back of the frame exactly where you want your mat to be; if the mat doesn’t go onto the frame back nice and straight it gets a little tricky moving it back off the ATG without tearing the mat. If you have done this correctly, you will have about ¼” of the frame back showing around the edges of the mat. I generally put a second strip of ATG over the edge of the mat and right out to the edge of the frame. I then cut a piece of brown craft paper to cover and seal the back of the frame. (This is also available at frame shops and craft stores that do framing; it looks like the paper from brown paper bags but is a slightly lighter weight) I then trim the craft paper to fit the back of the frame exactly with a razor blade. If the paper seems too loose you can lightly spray it with water, when it dries it will fit nice and tight. Then add your hanger (I use saw tooth hangers) and plastic bumpons to keep it from marking the wall and most importantly your card or sticker on the back. I print out a business card size sticker with an explanation of quilling and all of my contact info.

Thursday, July 26, 2007

Teaching/Learning Quilling Part #4 (Husking, Alternate Side Looping(ASL), Wheatears

Teaching Quilling-Part 4
Husking, Alternate Side Looping, Wheatears/Advanced


Oh! The wonderful things you can do with paper! In this class, I try to cover all of the things I didn’t cover in the first classes, easier said than done! This class covers husking, alternate side looping, wheatears, braiding, working with an onion holder (or comb), crimping and bandaging. I leave these topics for the last class making the assumption that by now, everyone is pretty comfortable working with those skinny little strips of paper and no longer feel like they are working with ten uncooperative thumbs! We have put some pictures up for you to refer to, a sampler with a braided basket, wheat ear and ASL (alternate side looping) flowers, alternate side looping designs in the corners (done with multiple color strips) and bandaging along the edge of the mat. We have also uploaded the instruction sheet I use as well as other example of husking etc.

Wheatears- This is a really simple technique. You simply hold the end of a strip and make a loop (you can put a tiny dot of glue where the paper passes the end of the loop.) then you continue by making a larger loop around the first and so on. When you have made as many loops as desired, cut the end of the strip and glue the end down at the starting point. Wheatears can be used for many things, they make pretty flower petals, or leaves; they can be left rounded or pinched to a point. I like to make long looping wheatears for foliage, like daffodil or iris leaves, I pinch them and curve them so they look like the real thing. Wheatears can also be done with pins, like husking, just arrange the pins in a straight line. Read on . . .

Husking-Husking is an interesting technique. Instead of rolling the paper, the paper is wrapped around pins on edge. I like to use some of the specialty papers for husking (graduated colors, two tones) because a husked piece is very open showing both sides of the strip. When I teach this class I give everyone a piece of Styrofoam, a piece of waxed paper, and a printed sheet with patterns marked out on graph like paper, and of course some pins. I start out by showing a couple of ways to get the paper started around pin #1, for me, this is always the tricky part. I show them how to wrap it around the pin several times or to make a tiny glued loop around the pin. Then we go through the steps of wrapping around pin #2, back to #1, around #3 back to #1 And so on. I tell them it is optional as to whether they want to put a dab of glue each time they get to #1, but they might want to the first time out. Once they have completed the shape, they have the option of wrapping the strip around the outside of the shape and gluing it back to the starting point. I tell them to twist the pins to remove them (just in case they got any glue on them) and then gently lift the finished piece off the waxed paper. Husking with pins has the advantage of making all of the shapes exactly the same size. With her boards there is no need for graph paper or drawing out designs. The metal pins are easily removed (they have no heads) and never “tip over” the way they do sometimes on a cork or Styrofoam board. You can see pictures of all of her boards on her web site (although she doesn’t sell retail) or on our web site Whimsiquills  We also carry Quilled Creation’s Husking Hoops & Loops, pictured on our kits page. This kit supplies a small cork board, 6 different printed husking templates, paper and pins. I would suggest making copies of your templates and using the copies for your husking so your originals don’t get too dog eared. I’m assuming you are going to love husking and want to use your templates over and over.

Alternate Side Looping-The best way I can describe this technique, is to call it husking without pins. Instead of using the board you actually hold the paper in your fingers . . . Make a loop, pass the paper under the starting pint and make a loop to one side of the center loop, pass it past the starting point and make a loop on the opposite side . . . hence the name, ASL. This is a little harder to describe without demonstrating, but there is an awesome book, “Quilling, Techniques and Inspiration” by Jane Jenkins (yes we carry it), which has great picture tutorials of all of these techniques (that’s how I learned them). I like to use the ASL technique using different color strips; instead of making the loop with one strip, I use two or three different colors, when you make the loops, pull the different color strips (just a little) so all of the colors show before gluing them.

Braiding-Braiding is just what it sounds like, take three strips (I usually tape the ends together), and then start folding, right over center, left over center and flatten and just continue just as if you were braiding hair. The look will vary depending on what width strips you are using, and when you get comfortable you can try it with 5 strips. The basket in the sampler was braided and we’ve scanned in a couple of braids “in progress” for you to see. Of course you could weave strips to make your baskets, but I think braiding or “plaiting”, as they say across the pond, is more fun. There is another type of dimensional braid which is awesome. It is the trunk of the palm tree. I used four different colored strips for the trunk. I am not even going to try to explain it without demonstrating, but look in your copy of Malinda Johnston’s “Paper Quilling (Weekend Crafter)” on page 38 and 39 and you will see Bobbye Singer’s excellent directions along with pictures. I actually penciled in 1, 2, 3, and 4 on my strips so I wouldn’t loose my place if I got interrupted. What? You don’t own a copy? Call us; we’ll get one right out to you!

Crimping-Crimping is a technique you see in a lot of antique quilling, except the early quillers didn’t have the neat little thingies we call crimpers. They made all of those tiny little folds by hand; can you imagine how long it took? You can tell they didn’t have TV back in the day! I didn’t want to break any copy write laws, by showing pictures from books, but if you have access to the Florian Papp Gallery catalogue you can see lots of crimping. Janet Wilson did a piece on page 4 of her book “The Craft of Quilling” in the style of antique quilling, you can get an idea of the way they used it. When I show how easy it is to crimp a strip with the Paplin crimper, everyone says “Well, what do you do with it?” Actually, I show a couple of crimping ideas in the flyer Paplin puts with the crimper. I like making the center of my sunflowers with a dark brown crimped strip; it kind of gives them a textured look. I also use crimped paper to make ferns in my wildflower pieces. Once again I will refer you Jane Jenkins book, “Quilling, Techniques and Inspiration” for lots of examples using crimping and there is a more recent book out by Molly Smith Christensen, “the new Paper Quilling” which has lots of crimping ideas, each one neater than the last. I LOVE her crimped watermelon and her crimped paisley mobile. Yeah! . . . We have this book too.

Onion Holder or Comb-This is not my favorite technique, although I do have to say I love the little angels everyone makes using the onion holder . . . I just don’t make them myself. We did put up a picture of a kind of snowflake I made using this technique and you can see pictures of the Quilled Creations combing kit  most of us are using onion holders instead of combs, besides the combs don’t have as many tines. You can buy the quilling comb by itself or in the above mentioned kit or you may have an onion holder in your kitchen gadget drawer! Some still refer to this technique as combing even though they are using the onion holder. The paper is wrapped around the tines flat instead of on edge, a totally different look made with the same old strips. Two tones strips work really well on some of these designs. Not to confuse the issue, but you can also make wheatears on an onion holder.

Bandaging-I was not familiar with this technique at all until some of my quilling friends came back from taking a master class at one of the English AGM’s. In this technique the strips are stacked to the desired thickness and then wrapped with a contrasting color. The sampler I keep mentioning (see top of page)has bandaging along the straight sides of the mat. I stacked dark blue, light blue and then dark blue strips and then wrapped them with a white strips. There is a great picture of bandaging in an antique piece on page 9 of Malinda Johnston’s “Book of Paper Quilling.” You will probably have to go to the library to see it as this book is now out of print.

As you can imagine I come to classes with armloads of books, samples, and quilling supplies in an effort to give as much information as I can cram into a session. I just realized as I was proofreading this, that somehow I turned all the pronouns around and it sounds like I am teaching you instead of trying to help you teach others. Oh well . . . I’m sure you got the gist. I hope it has been helpful . . . that’s all for now. Future topics include matting, framing, pricing, and quilling as a business . . . not necessarily in that order. Stay tuned . . .

Tuesday, July 24, 2007

Teaching/Learning Quilling Part # 3 (Wide Quill & Dimensional Quilling)

Teaching Quilling-Part 3

Wide Quill and Dimensional Quilling

The second class I teach is using the wider papers, and some dimensional quilling basics. Each student gets a multi pack of ¼”, and 3/8’ papers. I ask them to bring their tools and 1/8” strips from the previous class. I begin with the wide quill roses, because that is such a popular flower. The rose seems to take more practice than any other flower I’ve taught so that is usually the one I start out with.

Once again, in the interest of saving time, I precut the 3/8’ paper into the size pieces I use for roses. All of the quillers who take this class have already completed the basic class so they are pretty comfortable using the slotted tool, which is what I use to curl back the edges of each rose petal. When you look at the instruction sheet, you will notice that I do my rose centers a little differently than shown in most of the quilling books. (When I was taught to make roses, I was taught to put a loose coil in the center of the flower.) I like to continue making rose petals for the center by using ¼” hole punches. I fill the center of the flower with tacky glue and then stand the curled smaller petals (1/4” dots) up in the glue. I roll one dot into a tube and glue it shut for the very center of the rose. I also like to use several shades of the same color to make the roses more realistic. Ex: the first row of outside petals a very pale pink, the next row a little darker, and the center petals a darker shade. After the class members have completed their first rose, we move on to other flowers that can be created using ¼” and 3/8” papers. The class then learns how to “fringe” strips using scissors, and then how to combine different fringed strips to create an interesting variety of flowers. Once again, I “pre-fringe” some strips so students will have time to practice combining the different sizes.

I spend a little time in this class talking about dimensional quilling. This includes stacking or layering traditional shapes to create more of a 3-D effect and actually creating 3-D figures. Of course we cover the basics, learning to make tight rolls and then shaping them so they can be used to make tiny flower pots, or teddy bear bodies. I also show some outstanding examples of 3-D figures. I think Virginia Alexander’s (also a NAQG member) “Jinisans”are unsurpassed examples of quilled figures. Her book “Quilling in the Third Dimension” gives very detailed information about creating quilled figures . . . and yes we try to keep that one in stock as well. Examples of some 3-D quilling are shown in our gallery, I have a few of my dimensional pieces there, like the tea cup and the Christmas tree, and one of Sherry Rodehaver’s little tea cup critters, and be sure to look at the “Jinisans”, they are favorites of mine.

The last topic we cover in this class are some very basic “punch” flowers. While they are probably not considered to be quilling in a technical sense, punch flowers combine so well with quilling, that I like to include them in my classes. Again, I just cover some very basic ones to save time, I have some punched circles and hearts all ready for the class and then show them how to assemble them by using a tweezer to stand the petals up in a little dot of tacky glue, and then adding a quilled center. Sherry Rodehaver (yes she is also a NAQG member) has a great web site with lots of punches. If you enjoy playing with punch flowers, it is a must see. Here is a link to her site which we will also put on our resources folder.

FYI-in case you hadn’t noticed, we have some extremely talented people in the North American Quilling Guild (NAQG). If you haven’t already joined our ranks, you can join too.

Wednesday, July 18, 2007

Teaching/Learning Quilling Part # 2 (Basic Shapes)

Teaching Quilling-Part 2

Basic Shapes

I begin my first class by showing some borders and designs made with the basic shapes and I tell my students that by the end of this first class they will be able to create any one of the designs I show them. Of course, they don’t believe me. I then show them how to roll with a slotted tool, a needle tool, and finger rolling; I generally pre-cut some practice strips into two lengths, (3” and 6”) just to save time. Each student gets a package of mix/multi colored 1/8” strips and a slotted tool. I would ask my students to bring a small pair of sharp straight blade scissors and a pair of pointed tweezers from home. (I would always have extras on hand in case someone forgets to bring them) I didn’t require them to purchase a work board although I always had some of them on hand as well (especially since we sell all of the supplies), but for the class I would give each person a piece of Styrofoam covered with waxed paper, a damp paper towel, and a fine tipped glue bottle to use. Then they are ready to start.

The first thing I do is ask them all to take a 6” strip and insert it into the slotted tool and roll up the length of the strip. Then I tell them to let the coil fall off the tool into their hand, and to show me the loose coil. This is when I explain to them that different people will have different tension in their coils; just like two knitters can use the same weight yarn, the same size needles, yet one might knit very tightly and another very loosely. This usually helps them relax a little when they realize their coil doesn’t have to be exactly the same size as their neighbors. I go on to explain that the rolled coil is the basis for almost all of the shapes they will use in quilling.

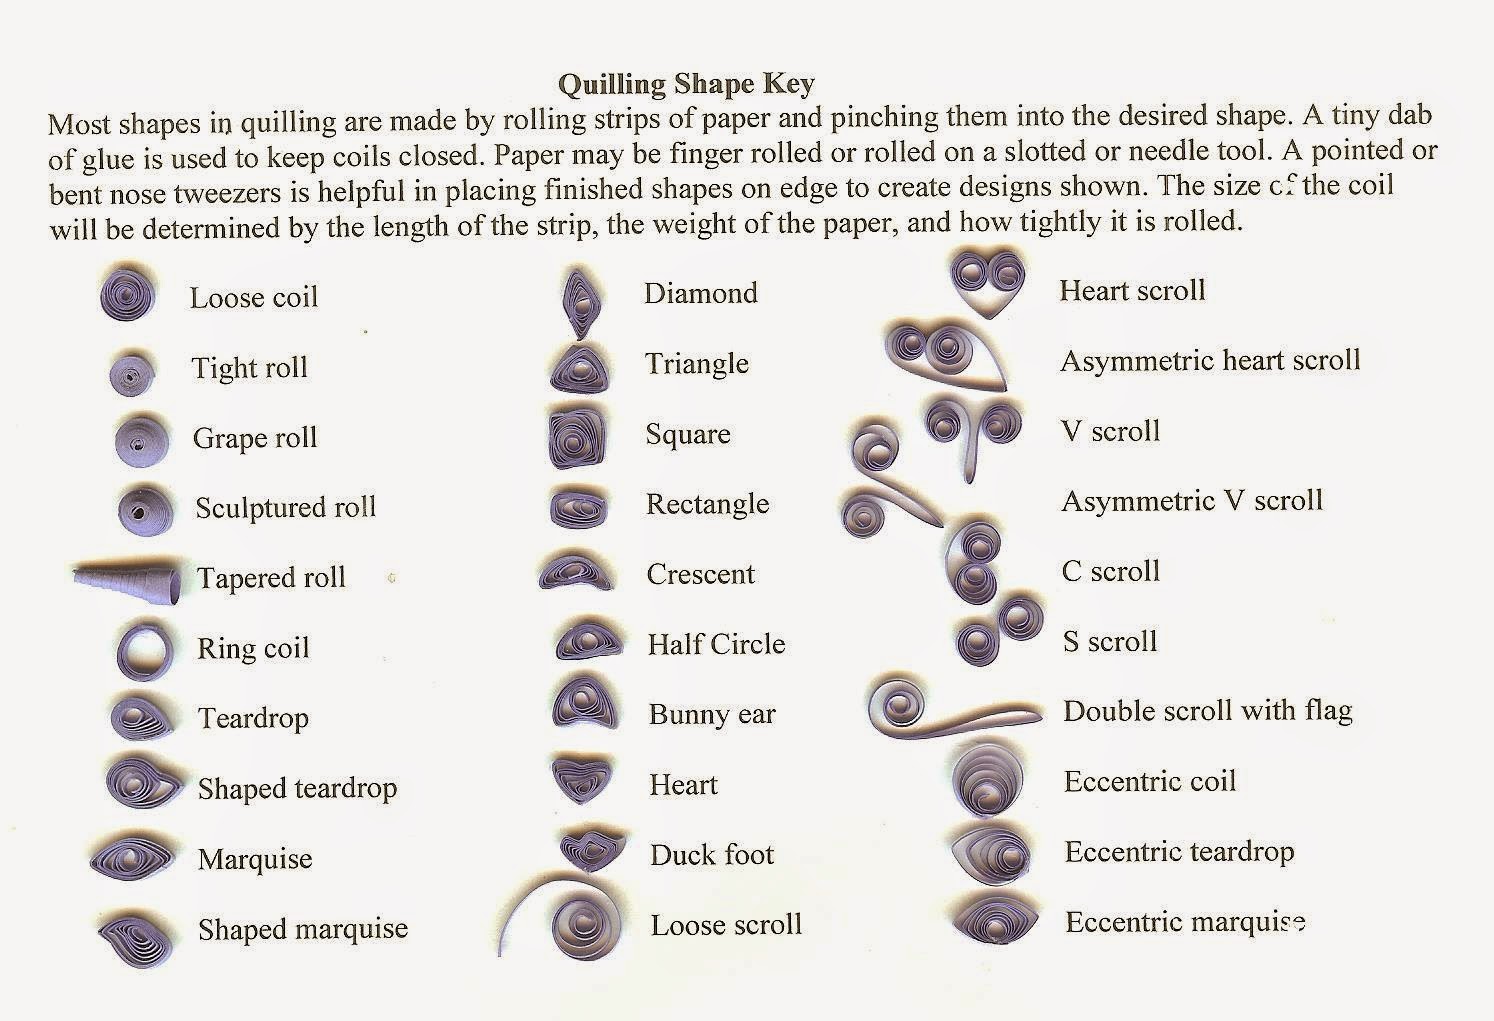
I provide a shape chart for each participant; we go through how to make the various shapes and they can glue them right on a blank shape chart. I often suggest they make the shapes with the 3” and 6’ strips so they can see the difference in size. We have a shape chart for you here, feel free to download them and print them out if you are so inclined, I only ask that you leave the Whimsiquills info on them so people can find us. Although we sell kits and patterns here at Whimsiquills, I don’t use them while teaching. I explain the difference between kits and patterns and show them how to use a pattern, by placing it on a work board and covering it with waxed paper or Mylar. I explain how important it is to make sure the quills are glued to each other rather than the waxed paper, and how to gently remove the finished piece or section of a piece by slowly peeling the waxed paper off the back of the piece without “popping” any of the quills. After everyone has practiced the various shapes, I bring out the finished pieces I showed them at the beginning of the class. I then point out all of the shapes they have just learned in the borders and designs. They are always amazed at how simple the design really is when you break it down into the various shapes. I then give each student a card or piece of mat board and encourage them to create their own design. It is fascinating to see the variety of designs they come up with.

As I said earlier, this is just my technique; I try to encourage creativity but NOT giving them a specific design to copy. Some will go on to purchase kits and follow patterns, while others will just do their thing. I know some teachers who have ongoing classes where each person in the class quills the same design and the next time they meet they will quill another, this is a good way for quillers to stay in touch and helps maintain their interest. Somehow even though I have the same 24 hours in the day as everyone else, I just don’t seem to have enough time to do much teaching anymore. Whichever approach you take, there are now lots of materials out there to aid in your teaching, certainly a lot more than when I first learned to quill! We have some really neat beginner kits and teacher packages here at Whimsiquills.com which include papers, tools, designs, and some extras like shape charts, mat boards etc. I also show my beginner students my two favorite books “The Book of Paper Quilling” by Malinda Johnston (which is now out of print but available in libraries and probably on Amazon and “Paper Quilling for the first time” by Alli Bartkowski. Both have excellent tutorials, Malinda’s book has lots of neat projects from different quillers (including a couple of mine) and a really neat gallery, and Alli’s book goes into great detail on 14 different techniques and also includes some projects and a gallery. We always have both books in stock since they are two of my favorites. Another book which is actually like a starter kit is “Twirled Paper” by Jacqueline Lee. This book comes with a tool, a package of paper, and glue. It is chock full of really cute ideas for the younger set including bugs, animals and aliens. It is a great gift idea for a child who likes to work with his hands and a great way to get our next generation of quillers started.

Stay tuned for part 3 which will be wide quill paper and dimensional quilling.

Monday, July 16, 2007

Teaching/Learning Quilling Part # 1

Teaching Quilling-Part 1

This will be a four part series since there is way too much information to put in one post. There are many different approaches to teaching; I’m going to cover a few of them and would very much be interested in hearing from others who have taught. Lots of questions come up about teaching quilling, especially for first timers. Hopefully this will give you some “food for thought”.

Your approach may differ depending on whether you are teaching in your home, a community center, or a store. Time, space, and fees will all play a part in setting up a class plan. If you are teaching in your home, you will probably be supplying everything your students need to take a class. I usually included a package of mixed/multi colored 1/8” strips and a slotted tool in the cost of the class. I would ask my students to bring a small pair of sharp straight blade scissors and a pair of pointed tweezers from home. (I would always have extras on hand in case someone forgets to bring them) I didn’t require them to purchase a work board although I always had some of them on hand as well (especially since we sell all of the supplies), but for the class I would give each person a piece of Styrofoam covered with waxed paper, a damp paper towel, and a fine tipped glue bottle to use. (When I first started teaching we didn’t have those wonderful little bottles so I would squirt a little white glue on a piece of waxed paper and supply a toothpick; I definitely like the glue bottle better. Nobody gets their elbow stuck in the glue while reaching over for scissors etc.)

When I teach, I like to have a small group of 6-10 people. That way I can get them all around a couple of small tables and really give each person my undivided attention. Although, I have to tell you, I once taught a group of 20+ sorority members aged 23-83 years old. (One of them had seen quilling and decided they should all learn to make quilled favors for a national sorority reunion).This was done in a private home. None of the rooms were large enough to accommodate the whole group so tables were set up in two different rooms. Of course I had to do everything twice because the “students” in one room couldn’t see or hear what was going on in the other room. I spent the whole evening running back and forth between the two rooms. (too bad this was before roller blades and wheelies). The crazy part was when the two groups decided it was a competition and would try to see which group could complete the next step first. What a crazy night! That night I felt like I had run a marathon.

If you are teaching in a store, class fees may be determined by the store and usually the store wants the students to buy their supplies at the store. Of course we all know how rare it is to find a store that has a “good” selection of quilling supplies. It gets a little tricky when the store has only minimal supplies; you may find yourself providing supplies from your own private stash. The time factor also comes into play, I like having about three hours for a class, I was never allowed to use that much time in a store setting so I had to adjust my “lesson plan” accordingly. I generally run a series of three classes: Basic shapes/beginners, Wide quill/intermediate and Husking/alternate side looping wheatears/advanced. Stay tuned . . . my next post will be Part 2 –Basic shapes.

Wednesday, July 11, 2007

Make Your Own Quilling Supplies Color Chart

Make your own color chart!


We get calls all the time from people who are trying to describe the color they are looking for. Sometimes they are current colors, sometimes they are colors that have been discontinued. We carry more than 200 colors here at Whimsiquills; we have at least 25 greens . . . so . . .it can be a little tough trying to figure out just which green our customer is looking for. To add to the confusion, some companies will call the colors by the names the paper mills give them, some rename them. Here is an example: some of Lake City’s Glistening papers are exactly the same colors as Paplin’s pearl colors. (P2164 Paplin Coral Pearl is the same as 426 Sunset glistening.) Let’s throw something else into the mix. We also sell papers from England; some of their names like Opal green, Oxford blue leave us clueless as to what the real color will be.

There are several solutions to this problem. We do offer our customers a color chart. This is a photo copy of actual strips, but is definitely not 100 percent accurate. But at least it will give you a pretty good idea of colors. Another possibility is sending a little snippet of the color you are trying to match; or the reverse, we can send you some samples. A great way to make your own color chart is to take a blank set of our order forms (or any one else’s) and start gluing small strips next to the color number, you will build your own very accurate color chart for future reference.

You do need to be aware that sometimes colors are changed because of manufacturer dye lots, and new colors are added and other colors discontinued. In some cases a color may be discontinued by one manufacturer but not by another. We have put together a chart which will tell you which colors can be substituted for different manufacturers. We are posting that list for your convenience.

Wednesday, July 4, 2007

How to Store Quilling Strips/Papers/ & Prequills


How should I store my quilling strips?

This is a question that comes up frequently. When I first started quilling, I tried keeping my papers in a big box. I kept the unused portions in the plastic bags they came in. When I just started, I would buy multi packs, you know, lots of colors in one package. Unfortunately when I tried separating the colors, I often made a mess of the pack. I ended up with what looked like spaghetti! Once I started buying individual packages of colors, I decided to hang them. I bought a couple of bulletin boards, (about 2’x3’), and put T-pins along the long side of the board. (T-pins are the ones shaped like the letter “T”, they are nice and long and the “t” prevents the strips from sliding off. You can buy them wherever they sell straight pins.) It helped to keep the strips nice and straight. I put each of the different sizes of the same color on one pin. For example; if I had narrow, 1/8’ and 3/8” of the same color, they went on one pin. Once I had all of the strips hung, I could tell at a glance which colors I had and which I was running low on. The other thing I liked about this storage system was its portability. I could take my “bulletin board’ full of strips anywhere, in any room. When it was time to put it away, I would cover it with a trash bag and slide it behind the sofa or into a closet. I still keep my whites/ivories on a bulletin board since I use them so much.

Of course, you don’t use a whole strip for each quilled coil. There are always leftover pieces. I started keeping my leftover pieces and any extra coils in the little chests they sell in hardware stores. Once again I arranged them by color. This worked out well for me; if I needed just a couple of small pieces to make a flower for a gift card; I almost always had exactly what I needed in these drawers. I use a lot of 6”, 3”, and 1 ½” strips. These fit perfectly in the drawers which are just about six inches deep. I also use some punched flowers in my floral pieces, so any extra “punches” also get stored in these drawers.
Once my hobby became “Whimsiquills the business”, (and after my children left home), I set about making what we all call the ‘Whimsiquills room”. Now I have a whole room dedicated to my work I had a huge window put in to give me natural light, I use an Ott light at night. I hang all of my papers on a strip my husband put up for me that goes halfway around the room.
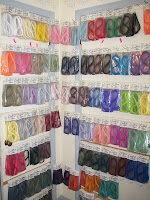
If you are lucky enough to have a work or craft room you can use the back of the door for storage as well. I have all of my 1/6’ and 1/8” Paplin papers stored on the back of the Whimsiquills room door and on a closet door. We simply put up some strips and then measure and put in nails so we could hang the packages. If you store your papers in packages, this might be an option for you. Then you also have the color number right on the package. I usually write the color number on the outside of one of the strips.

This is my not so neat work table which is right by a window, lots of natural day light.

Sunday, July 1, 2007

Which is better when quilling? Using a tool or finger rolling?

Quilling Tools vs. Finger Rolling?

Which is better, using a tool or finger rolling?
How you roll your quilling strips is really a matter of personal preference. I don’t believe there is a hard and fast rule, although many quillers have very definite opinions about the subject.

Slotted tool- When I first learned to quill, I learned using a slotted tool. You just ‘thread” the beginning of a strip into the slot and then turn the tool until the strip is completely rolled. Let the strip fall off the tool and then pinch into desired shape and glue. Depending on the slotted tool you use, there will be a small opening in the center of your tight rolls (the size of the hole is determined by the size of the shaft of the tool). There may also be a tiny fold in the strip where you first inserted the strip into the tool. This little fold or “hook” is offensive to some quillers. (I have never had a customer mention this little hook) If this is a concern for you, the hook can be eliminated by reversing the tool before releasing the roll. It can also be eliminated when you pick up the roll with a tweezer.

Pin or Needle tool-I know that many of the early “1970’s” kits came with a corsage pin. When you use a pin, you roll the paper around the pin (instead of turning the tool), the hole in the center will be smaller and there will be no hook.

Finger rolling-When finger rolling your strips, it helps to soften the paper a little by running it over your finger nail, much like you would with curling ribbon. I usually have a damp washcloth nearby and dampen my fingertips so it is a little easier to get the roll started. Your finished roll will have a very tiny center opening. I also find that my rolls are a little “tighter” when I finger roll. After using a slotted tool for many years, the repetitive motion began to bother my thumb, so I forced myself to learn to finger roll. I quickly realized this was also easier on my tired old eyes since I was no longer required to ‘thread’ my slotted tool. Now I finger roll most of my strips but still use my slotted tools for rolling fringe flowers and curling back the corners on my rose petals.

I do have a funny story about finger rolling. A couple of years ago I did a taping for the DIY (Do It Yourself) network demonstrating quilling and how it can be used for scrapbooking. I had to fly from Connecticut to Tennessee for the taping. With all of the security restrictions on the airlines I thought it best to put all my quilling tools, tweezers and scissors etc. in my checked luggage. Of course my bags were opened and inspected. The next day as I prepared to do the taping, I opened the box with all of my tools and realized I had no slotted tool! Thank goodness I knew how to finger roll! The DIY folks were pretty impressed with my finger rolling although it was harder to tape. (I was only allowed to move my fingers a tiny bit so the camera could zoom in.) At any rate we got through the taping and when I packed my bags to fly back home, there in the bottom of my suitcase was my slotted tool! When they inspected the bag they just didn’t put everything back where they found it. And I am sure they had no idea what they were looking at.