Meet Pat

Video (Meet Pat) -

Sunday, November 17, 2013

Sadly, There is more to life than quilling

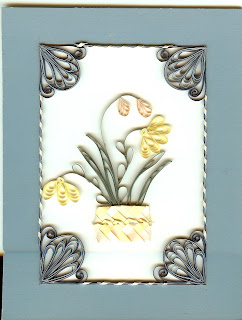
 I’m sure many of you are disappointed with the lack of activity on this blog. I have been going through a period of adjustment since I am no longer able to do much quilling. Gone are the days when I could quill for hours at a time; it was always so relaxing.  Now my hands and neck complain after just a few minutes. I have been turning away custom work for several months now and it has taken me a while to get past my disappointment. However I still have Whimsiquills which keeps me in touch with other quillers and I am able to do some small projects like those pictured here.

Now that I have a little free time, I have been spending it with my two dogs, my new puppy (there is no better cure for depression than a little puppy), and a two year old Shih Tzu I am fostering trying to get him ready for a “forever” home. I am writing about this experience in Furry Fosters. If you are a dog lover, you might enjoy taking a peek at little Shylo’s progress.

Last week we brought in Alli Bartkowski’s DVD Quilling Made Easy(QC550) so I sat down and watched it. I have always said anytime quillers get together they will learn something new. Alli demonstrated a technique called the “beehive”. I had never tried it but thought it looked like it would be a good way of filling in areas and keeping it open and lacy looking. So I tried it and here are the results.  I did the Christmas tree using crimped paper just to see what it would look like. The Poinsettia I made with uncrimped papers. I created the petals using ring coils (wrapping the paper around a ¾" dowel four times) and then used the beehive technique to fill the petals in. I really like the look. The leaves are limple alternate side looping, and the center is a 6" strip of 1/4" paper fringed. I am fringing using a fringing die (QCT184) these days since my hand tires very quickly using my fringer. I did the poinsettia in one of our domed cards which means I can mail it with no special packaging at the first class rate. I really love these cards. They come with a round or oval dome.Alli mentioned in the DVD that this technique was used in antique quilling and shows a 17th Century reliquary and has recently been named the beehive technique. There are many tutorials on YouTube if you are interested. Just search for “quilling beehive technique”. The technique is also describe in Creative Paper Quilling (B70105) a new book put out by Annie's Paper Crafts . The book has projects designed by many different quillers.

Tuesday, May 21, 2013


I have been quilling around wedding invitations for years. It’s always interesting to see what will come in the mail or through the door. When my best friend’s daughter was getting married last year, of course I wanted to do something special. When I saw the invitation I was stumped. It was a large 7” square  embossed with a large & and the text took up a couple of inches in the upper right hand corner. Typically, when I get something unusual or challenging, I just let it sit a while and keep going back and looking at it until an idea comes to me. I knew this was going to be a black and white wedding so that was a start. I wanted it to be dramatic but still keep the "flavor" of the invitation. Here is the final result (minus the frame). The bride loved it!


Thursday, February 14, 2013

Domed cards for Quilling

These domed cards are my new favorites. They are actually a tri-fold card so all of the mechanics of placing a back ground, quilling, and the dome are well concealed. They also travel through the mail really well with no extra packaging at the first class rate of US $.46. I decided to use a two inch border punch on the top and bottom of the face of the card to dress it up a little. I backed the punched area with a ½” wide strip of quilling paper. I cut a colored piece of accessory paper slightly larger than the outside dimensions of the dome and marked the center of the paper to center my design. I didn’t fasten the dome to the card right away so I could occasionally lay it over the design as I worked. (I wasn’t sure how close to the edge of the dome I could get or how “deep” the quilling could be.) I was pleasantly surprised that my roses, which I make using 3/8” strips fit under the dome beautifully. Once I worked out my design, I taped the dome inside the opening and then centered my design inside the dome and taped it in place. Then I used a double-sided tape to close the third panel over my efforts. I did find it a little tricky figuring out where the design should be placed so it was right side up when the card opened. I also noticed that the two end panels are very slightly different in size as one is meant to cover your work and the other is meant for the greeting. These come three to a package (with envelopes) for $5.50; the item number is ECSK417021 if you would like to try them. I would love to hear what you think of them.

Friday, February 8, 2013

Vintage Quilling Books

Over the last 35+ years, it has been my privilege to meet and get to know some of the quillers who were responsible for the resurgence of quilling here in the United States in the 1970’s. I’ve had the pleasure of meeting Betty Christy (author of Quilling Paper Art for Everyone published in 1974), Marlene Bartels (owner of Quill It), and I still stay in touch with Malinda Johnston (founder of Lake City Crafts). Recently, I have been visiting (over the phone) with Gini Antoine. Now in her 80”s, Gini “discovered” quilling in the 1960’s. At the time she was giving painting lessons and very active in the world of arts and crafts traveling around the country teaching and demonstrating at the national hobby industry shows.

She visited a friend who showed her a piece of antique quilling. She was fascinated and like so many of us, she got hooked. She formed a company which she called Priceless Pastimes and starting selling kits and strips and adding color to her work. She published two books Heirloom Treasures Quilling Book I which includes patterns for a wreath, Christmas tree, a Spanish fan, "crystal" snowflake, cross and a peacock among others. Heirloom Treasures Quilling Book II includes designs for wheat, mushrooms, an Owl, snowflakes, cross and some very pretty borders.

She was the quiller who Betty Christy to quill and is credited with naming the different shapes. In her book Quilling Paper Art for Everyone Betty Christy said “More than ten years ago, Gini Antoine of Independence, Missouri, pioneered a delicate lacy form of paper filigree. She began the custom of naming the various coils when she first researched and introduced what she called a “lost art.”

I have had several delightful conversations with Gini and learned that she still had some of the books she had written. These are vintage books published in 1970 and 1972. My two favorite designs are a lacy Victorian Christmas tree, and a rather intricate Valentine border design. There are also several pretty snowflake designs. For those of you who are collectors of “all things quilling” I have put them up on the web site.


Thursday, January 31, 2013

Valentine

At the beginning of the New Year I usually spend some time trying to reorganize my quilling studio. Sometimes I am surprised by some of the things I find. Since I haven’t been able to do much quilling, I’ve spent a little more time straightening up. I found this sampler I used to bring to my advanced quilling classes back when I was teaching. It shows bandaging, wheatears, alternate side looping, and braiding. Sometimes I think that because I’ve been quilling for so many years I kind of get in a rut using the same techniques over and over.

I am very slowly getting back to quilling, the acupuncture seems to be helping. So I decided to play a little and made this little Valentine card. I cut out a heart shape of light pink paper and then used the bandaging technique to outline the heart. (For those of you who may not be familiar with that technique, I stacked six strips of pale pink and then “wrapped” a darker pink strip around the stack) and outlined the heart.(it is easier to see on the sample since I used a contrasting color for the wrap.) I used 6” strips and made 11 tight rolls and 10 uneven S scrolls. I started at the bottom of the heart placing a tight roll at the outside point off the heart and then started alternating the S scrolls with the tight rolls adjusting as I went. (When I make this kind of border, I don’t start gluing until I get the spacing worked out) I put an open V scroll at the top of the heart and added a 12” tight roll in the center of the V.

The design in the center of the heart started with a 12”sculptured roll in the center; then I added a 6”open heart scroll inside of a 6” open V scroll at the top and bottom of the sculptured roll. I then added the four 6” teardrops.